Lost Ark players chase Mokoko Seeds because they pay off: skill point potions, silver, titles and cosmetics. I’m a longtime player and I’ll walk you through Yudia’s 69 Mokoko Seeds so you don’t waste time running back and forth. Honestly, seed hunting taught me more about the map than most quest lines did.
🌱 What Mokoko Seeds Do (and why you should care)
Mokoko Seeds are small collectibles you trade for rewards. They don’t buff you on the spot; they pile up in your collection and unlock prize tiers. I’ve noticed the skill point potions are the single biggest draw — they scale your character broadly, which is why many players prioritize seeds over petty gear swaps.
Why collect them? Because they force you to explore, and exploration nets other loot and lore. Also: they teach you mechanics like breaking walls or using flares. That’s useful later.
“Collecting Mokokos is less about greed and more about map sense.” — a quick tip from my playtime
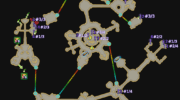
📍 Yudia at a glance
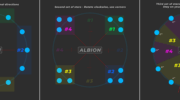
Yudia has 69 seeds split across four zones: Saland Hill (18), Ozhorn Hill (16), Battlebound Plains (21), and Aregal Salt Plains (14). These numbers are current as of March 12, 2025.
| Zone | Seeds | Typical Access |
|---|---|---|
| Saland Hill | 18 | Easy — basic tools |
| Ozhorn Hill | 16 | Medium — grenades help |
| Battlebound Plains | 21 | Medium–Hard — quest phases |
| Aregal Salt Plains | 14 | Medium — some quest locks |
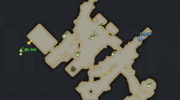
🗺️ Saland Hill — starter seeds
Saland Hill is training ground: 18 seeds mostly along quest paths and settlements. You’ll learn how to spot alcoves and breakables here. I recommend doing main quests and checking behind buildings as you go.
Some seeds hide in Loghill’s lumber areas and in small caves. Bring flares for dark spots and grenades for wooden barriers. Why? Breaking obstacles opens new routes and saves time later. Also, rapport with NPCs sometimes unlocks fenced areas (there are exceptions; rapport won’t always open everything).
Quick checklist (use a screenshot or note):
- Loghill secret area — 3
- Main path — 5
- Residential areas — 4
- Forest clearings — 3
- Hidden caves — 3
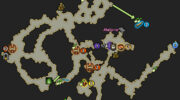
🏔️ Ozhorn Hill — think vertically
Ozhorn has 16 seeds tucked into ruins and cliffs. The zone rewards vertical thinking: check ledges above and below the obvious paths. We found seeds behind destructible rocks and in underground rooms unlocked by quests.
Read quest text. Sounds boring, right? But the lore often hints at collapsed halls or secret staircases that hide seeds. I’m serious: reading pays off.
Hotspots
- Ancient Fortress — 5 seeds in chambers
- Mountain overlooks — 3 seeds
- Underground ruins — 4 seeds (quest-gated)
- Cliff caves — 2 seeds, tricky jumps
- Settlements — 2 seeds near NPCs
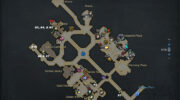
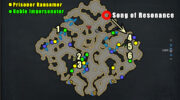
⚔️ Battlebound Plains — the tough one
With 21 seeds, Battlebound is the hardest in Yudia. Expect bunkers, trenches, and guarded spots. Some seeds only appear during certain quest phases, so mark them and return later (this happens a lot).
Combat matters here. You’ll need patience and decent gear to clear elite guards that block access. Try stealth in some outposts — it’s faster than slugging through mobs. Controversial take: relying on other players to clear every seed is lazy; solo practice builds real skill. Some will disagree.
Seed breakdown (general):
- Northern battlefield — 6 (high combat)
- Central command — 5 (quest-locked)
- Southern trenches — 4 (puzzles)
- Eastern outposts — 3 (stealth-friendly)
- Hidden bunkers — 3 (need explosives)
🌊 Aregal Salt Plains — bright and tricky
Aregal has 14 seeds among mines, salt flats and watery pockets. The glare from white salt makes seeds hard to spot. Bring patience and watch for mining gear you can interact with; some seeds require quest progress or rapport.
| Location type | Seeds | Access |
|---|---|---|
| Mining facilities | 5 | Quest or gate |
| Salt flats | 3 | Walk-up |
| Water spots | 3 | Swimming |
| Worker camps | 2 | Rapport/quests |
| Hidden cave | 1 | Secret entry |
💡 Practical tips that actually help
Bring at least 20 grenades and 10 flares. Why? Many seeds sit behind breakables or in darkness. You’ll waste time if you don’t. Also, clear inventory before a session — seeds and junk stack quickly.
Route planning matters. I usually follow quests and sweep nearby spawn points. That saves travel time. Use screenshots as markers (it’s a habit: screenshot then come back), and don’t rely only on external maps — they get stale.
Community resources help, but there’s a catch: maps are sometimes wrong or outdated. Check dates and patch notes before trusting a guide (March 12, 2025 patches changed a few spawn locations).
Toolkit (short)
- Grenades — 20+
- Flares — 10+
- HP potions — as needed
- Free inventory slots — at least 10
- Patience — yes, really
Here’s the funny part: skipping a handful of early seeds can speed up your leveling because you avoid time sinks, then come back later with tools and quests that make the hunt trivial. Counterintuitive? Yes — but it worked for me.
// quick coordinate note example
// use this pattern to mark spots in screenshots
X: 1234.56 Y: 789.01 — Saland Loghill cave
Want a controversial second point? I think too many players treat seeds like a checklist and miss the world’s charm. Seed hunting should be a way to learn the map, not a stress test. Between us, sometimes I wander just to enjoy the scenery.
One last thing (I stumble here—sorry): if you focus on exploration mechanics early, later continents feel smaller. It’s like learning to read a map once, then every place becomes clearer. Keep the goals reasonable, expect exceptions, and you’ll collect all 69 seeds without burning out.