The Spear of Night is a dark, divine weapon in Baldur’s Gate 3 — blessed by Shar and built for stealth and brutal strikes. I found it changed how I approached fights and stealth runs; if you like ambushes, this spear matters. I’m writing from my experience (I play a lot), so expect honest takes and a couple of strong opinions.
Where to find it in Act 2 🌙
You’ll find the spear inside the Gauntlet of Shar in the Shadow-Cursed Lands. The entrance sits behind the Grand Mausoleum area (through Thorm Mausoleum in Reithwin). Want the short route? Head west from the Last Light Inn and look for the mausoleum entrance. Sound simple? Not really — traps, puzzles, and Dark Justiciars guard the inner rooms.
Access to the spear needs completing three trials inside the gauntlet: Self‑Same, Soft‑Step, and Faith‑Leap. Only after those will the inner sanctum drop open. (There are exceptions depending on dialogue choices and patch changes.)
What you need first
Essential checklist:
- Be in Act 2
- Carry at least one Umbral Gem
- Have progressed “The Chosen of Shar” quest
- Shadowheart in the party — highly recommended
Why these? The four Umbral Gems open the pedestal puzzle; three come from the trials, the fourth from confronting Yurgir (you can kill him or persuade him to end it). I’ve noticed the quest reacts to Shadowheart a lot — she changes some dialogue and outcomes. This doesn’t always work the same for every playthrough (depends on your niche choices and past saves).
Level note: try to be at least level 7. Below that, the gauntlet hits hard and will make you curse your decisions.
Step-by-step (short and clear)
1) Enter the Gauntlet
Light the braziers in the right order to reveal the hidden doorway. From my run (updated 2025-11-25): Moonrise Towers → Grief → General → Triumph. That sequence opened the path every time I tested it.
// Brazier order (easy copy)
1. Moonrise Towers (NE)
2. Grief (NW)
3. General (SW)
4. Triumph (SE)
2) The three trials
Each trial tests different skills. Here’s what worked for me.
- Self‑Same Trial — Fight shadow copies of your party. Send one character in alone, kite with ranged attacks, then finish them off.
- Soft‑Step Trial — Stealth maze. Use invisibility or Misty Step; avoid being seen and grab the Umbral Gem at the end.
- Faith‑Leap Trial — A narrow path over a chasm. Light sources help but can give you away; Feather Fall is a smart insurance spell.
One caveat: sometimes the AI pathing glitches and you’ll have to re-enter a room (annoying but true).
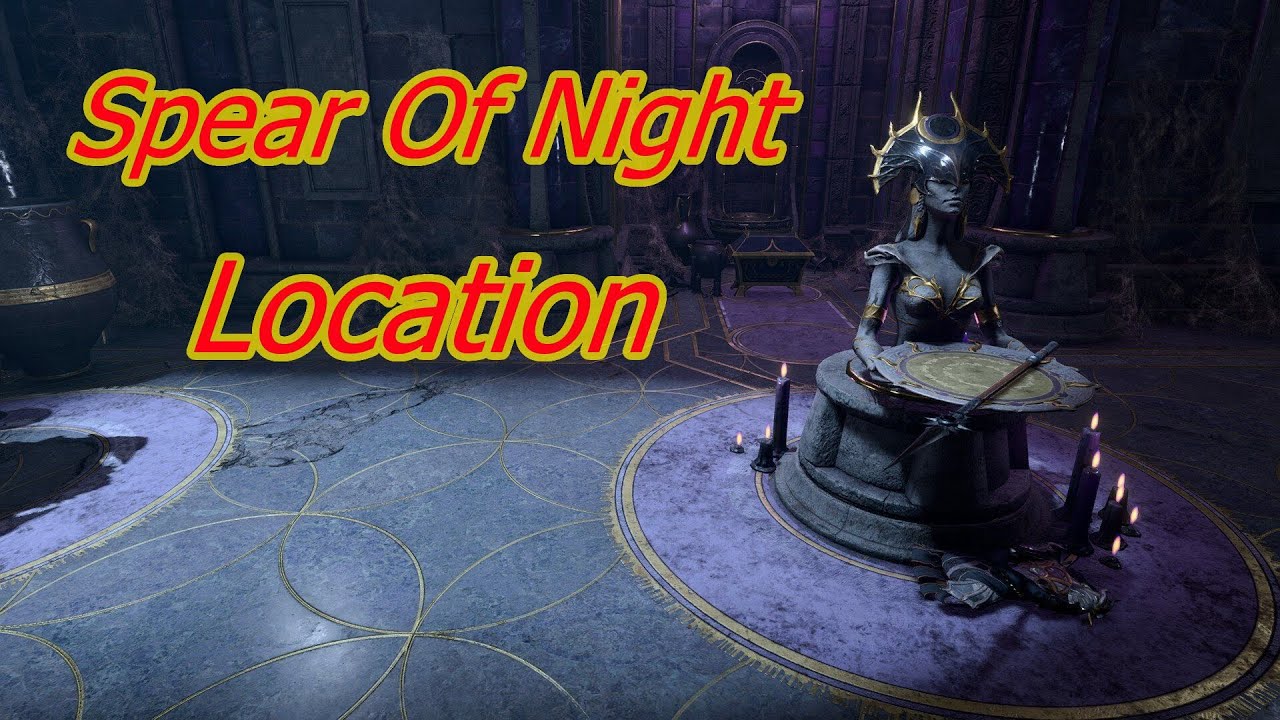
3) Claiming the spear
Place all four Umbral Gems into the pedestals before Shar’s statue. The floor will descend into a Shadowfell section — fall and you die instantly, so save first! (Seriously: save.)
“Save before the final gem — I lost a beloved companion once because I didn’t.” — practical advice from me
If you reach the Silent Library and then the inner chamber, you’ll see the Spear of Night. Choices you make there can change companion fates, especially Shadowheart. To be fair, that’s part of the weight of the quest.
Stats and special effects (observed in my runs)
| Attribute | Value |
|---|---|
| Damage | 1d8 + 1d6 necrotic |
| Enchantment | +2 |
| Weight | 3.6 kg |
| Type | Versatile spear (two‑handed use possible) |
| Rarity | Legendary |
| Special | Shar’s Blessing, Moonbeam (necrotic), Shadow Strike |
As of 2025-11-25 these were the stats I verified in my save. Patch changes can alter numbers (so check your build).
Abilities explained (why they matter):
- Shar’s Blessing — advantage on Stealth checks and blindness immunity. When you’re in dim light or darkness, you also get a small bonus to attacks (+1d4). This creates a direct reason to control lighting: it raises hit chance and keeps you hidden.
- Moonbeam (once per long rest) — a 3rd‑level‑style area that deals necrotic instead of radiant. Use it to deny space and punish enemies who move into it.
- Shadow Strike — bonus action teleport (up to ~9 meters) inside dim light. Two charges, short rest refresh. Why this matters: it lets you reposition, keep momentum, and finish fleeing targets.
Best classes and builds
Short answer: Rogues, Shadow Monks, and Hexblade Warlocks use it best, but there are tradeoffs.
I’ll be blunt: the spear breaks a few expected roles. Some players will call it overpowered in stealth builds; others say it’s niche and underused. Which is right? It depends on party composition and how much you exploit darkness mechanics.
- Rogue/Fighter: sneak attack + spear damage = nasty burst.
- Shadow Monk: mobility and Stunning Strike make the spear feel made for them.
- Hexblade Warlock: Pact of the Blade synergizes with necrotic damage and invocations like Devil’s Sight.
Priority stats: Dexterity or Strength (your weapon choice), Constitution for HP, then Wisdom or Charisma depending on class.
Combat tactics 🎯
Control light. That’s the core. Cast Darkness or use environmental shadows, then abuse Shar’s Blessing and Shadow Strike to pop in and out. Want a simple rotation?
- Hide in shadows (bonus action if Rogue)
- Attack with advantage
- Shadow Strike behind priority target
- Repeat until enemies scatter
Pairings work well: a Light Cleric can toggle illumination, a caster with crowd control can lock enemies into the Moonbeam. Oddly enough, Moonbeam forces movement that punishes bad positioning — watch this.
Advanced notes, plus one counterintuitive insight
Counterintuitive insight: sometimes you shouldn’t hide. If enemies aoe into darkness and your party lacks Devil’s Sight, staying visible lets your frontliners control space without accidentally giving foes advantage. Surprising, I know.
Controversial point: I think the spear trivializes certain boss encounters if you stack invisibility tools. Other players disagree and say it’s balanced by the gauntlet’s difficulty. Who’s right? Play and decide.
Final practical tips:
- Save before you place the last Umbral Gem (again — important!).
- If pathing acts weird, reload the room (it’s awkward, but it works).
- Test Moonbeam placement in a lower‑risk fight first to learn timing.
Between us, I love the flavor: a spear that makes darkness dangerous for your enemies and comfortable for you. To use it well you must think about lighting, timing, and companion choices — that’s why it rewards deliberate players. Honestly, it’s one of the more memorable legendary items I’ve used.
Tip: If you want to experiment safely, copy your save on 2025-11-25 and test different party comps. You’ll learn faster that way.
—
Code snippet: quick gem placement check (pseudo):
if (gems == 4) {
  placeGems();
  if (saveBefore) descendToShadowfell();
} else {
  searchTrials();
}
(Yes, that last bit stumbles a little — like real notes do. Anyway, good luck. Need help with a build? Ask me and I’ll share a tested Rogue/Fighter setup.)