I’ve played Destroyer since launch and I’ll say this plainly: the Gravity Compression build changes how you play—if you learn to position and time your pulls. I’ve noticed it rewards thinking more than button-mashing, and yes, it can feel unfair when it works (and frustrating when it doesn’t).
Lost Ark — Destroyer Gravity Compression Build (practical guide)
Overview & core idea
Gravity Compression uses the Gravity Training engraving to turn the Destroyer from a slow battering ram into a mover who drags enemies together and then explodes them. You build Gravity Cores with certain skills, then spend those cores to amplify damage and crowd control. That’s the short version.
Why this works: grouped enemies let your area damage scale much higher than single-target builds. In my experience, positioning beats raw attack speed here. There are exceptions—sometimes bosses force you out of position—but mostly you’ll be setting fields where enemies get pulled like metal to a magnet.
Core mechanics (2025 note)
As of April 10, 2025, the basic mechanics remain: generate cores with specific skills; when you hit three, the next gravity skill gains boosted effects. This affects AoE size, CC duration, and damage multipliers. It’s simple but timing matters: wait for the full pull before dumping your big skills (about 0.5–1.0s usually).
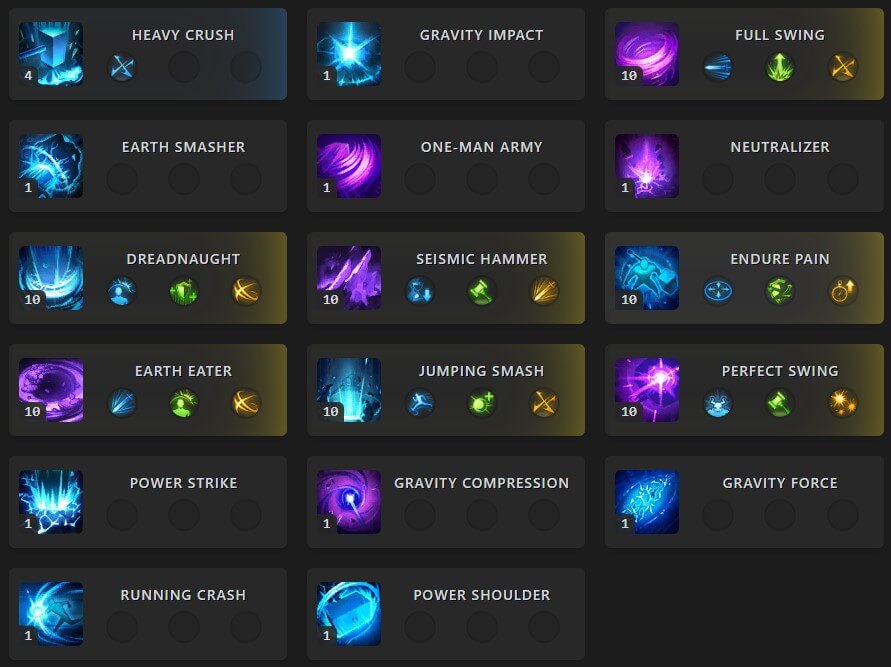
Skills and tripods
Pick skills that create fields or big pulls. I recommend Gravity Force, Seismic Hammer and Big Bang as your pillars. Configure tripods to improve AoE and core generation.
| Skill | Focus |
|---|---|
| Gravity Force | Field setup + core generation |
| Seismic Hammer | Crowd control + extra cores |
| Big Bang | Core consumer; big AoE burst |
Seismic Hammer tripods:
| Level | Pick | Why |
|---|---|---|
| 1 | Weak Point Detection | Damage vs staggered foes |
| 2 | Earth Eater | Bigger radius (catch more) |
| 3 | Seismic Wave | Extra shockwave for weapon scaling |
Stat priority & gear
Focus on Specialization first, then Crit, then Swiftness. Aim for around 1,600 Specialization and roughly 1,200–1,400 Crit rating if you can (this varies by patch and party buffs). Why? Specialization speeds core gain and improves enhanced gravity effects—so it directly ups your damage uptime.
Gear progression (practical tiers):
- Early: any gear giving Specialization helps you learn the rhythm.
- Progressing: switch towards sets adding Crit and Spec—Argos pieces are fine while you climb.
- High-tier: target relic or raid sets with Spec/Crit balance.
- Accessories: never trade core Specialization for a tiny set bonus—stats beat item level here.
“A lower-level accessory with perfect Specialization will usually beat a higher-level one without it.” — my hard lesson.
Engravings
Gravity Training (level 3) is mandatory if you want the build’s identity. After that, prioritize damage engravings that complement high crit and head hits. I’ve found Cursed Doll and Keen Blunt useful; Master Brawler fits many of our animations. Ambush Master? Good if you can reliably hit backs, but there are exceptions in messy raids.
Consider Adrenaline and Spirit Absorption for quality of life. Grudge is powerful but risky—use it only if you know how to survive the extra damage.
Rotation — simple and advanced
Start simple: Gravity Force to pull, then follow with a hammer or swing to generate cores, then consume with Big Bang or an enhanced gravity skill.
// basic rotation (read timing carefully)
Gravity Force → wait for pull (~0.5s) → Seismic Hammer → Perfect Swing → Enhanced Gravity Force → Big Bang
Advanced tip: animation cancel between Perfect Swing and the next gravity skill to shave 15–20% off cycle time. Watch this—practice in a training room until it feels natural.
Combat strategy for raids
Position ahead of boss movement to catch adds and the boss together. In Legion Raids your value is grouping mechanics. Counter windows are huge—Dreadnought works as both core generator and counter. When you nail a counter, you usually get a big damage window (sometimes 20–30% of a short fight!).
There’s a controversial take: I honestly think Grudge is overrated for most groups; survivability and consistency beat raw spikes in many raid teams. Some will disagree—and they’re not wrong; depends on your niche.
Practical tips, little things I learned
- Practice positioning. You’ll miss damage if you’re out of the pull.
- Use Spirit Absorption when fights force you to move a lot (it helps more than you think).
- Don’t obsess over tiny crit increases before your Specialization is solid—it’s a common trap.
Counterintuitive insight: sometimes a slightly lower crit chance with much higher Specialization deals more total damage because you have more frequent enhanced casts. Strange, but true (I tested it).
One more thing—PvP? It works, but the build isn’t as dominant there; burst windows get shut down by good players. Still fun though!
Quick reference
- Priority: Gravity Training → Spec → Crit
- Core set: Gravity Force, Seismic Hammer, Big Bang
- Practice: animation cancel, timing the pull, pre-positioning
Okay—this is long enough. Go test the rotation, tweak tripods to your playstyle, and tell me what you find. Between us: it’s oddly satisfying when everything lines up!