Welcome. I play mage PvP in Rift and I write plainly: the Pyromancer/Dominator pairing is the clearest route to strong results as of 2025-11-26. I’ve tested this on warfronts and in arena; you won’t need every theoretic min-max trick to win—you need clarity and timing. Honestly, practice beats perfection.
Short version: Pyro 44 / Dominator 22 is the core most teams expect to face. That gives huge burst and reliable control. There are exceptions depending on your role and team comp (depends on your niche), but this is the fastest way to climb if you want impact quickly.
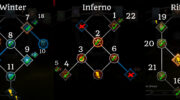
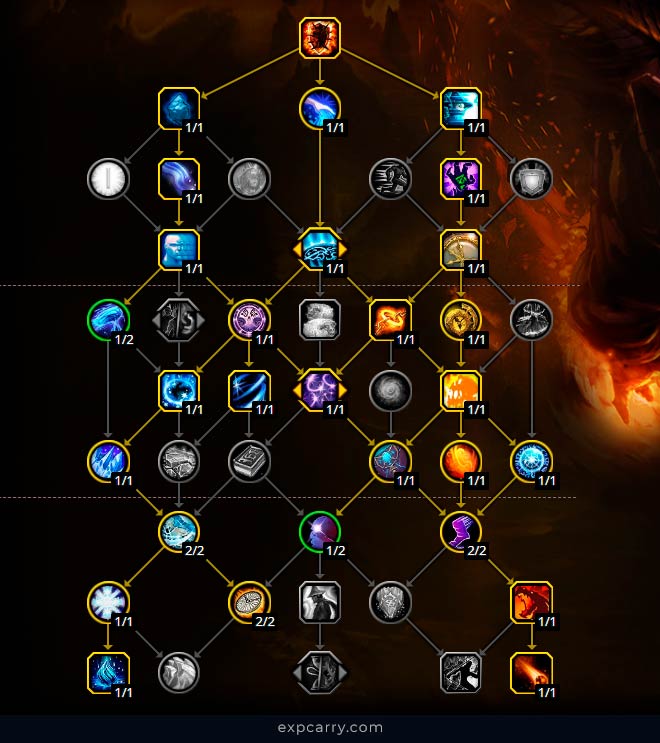
Build snapshot
This combo works because Pyromancer is your damage fuse and Dominator is the bomb’s safety switch—together they let you blow up priority targets without dying right after. I’ve noticed players who ignore control lose games faster than those who ignore a few stat points.
Core distribution (my playtests):
- Pyromancer: 44 points
- Dominator: 22 points
- Archmage/Archon: 0–5 points (optional, but I rarely take them)
Controversial note: many players swear by Archmage for sustained damage. I disagree—short fights favor raw burst and reliable CC. Fight me? (Okay, don’t).
Gear and stats (why each matters)
Pick gear that helps you survive player damage and finish targets. Valor and Vengeance matter because they change how long you stay alive vs other players; Spell Power drives kills. That’s why I favor warfront Valor sets for PvP slot priority. There are exceptions—if you play mostly 1v1s, you might skew differently.
| Stat | Why it matters | Target |
|---|---|---|
| Spell Power | Direct damage increase | 1200–1400 |
| Valor | Reduces player damage taken | 300+ |
| Focus | Mana pool and sustain | 150+ |
| Spell Crit | Burst chance, but situational | 20–25% |
Quick tip: 2-piece and 4-piece PvP bonuses often beat raw stats in real fights because they reduce death spikes. Surprisingly, a bad stat roll with a strong set bonus often performs better than perfect stats without the bonus.
Openers and crowd-control chains
Why this sequence? Because you want guaranteed damage windows. In my experience, the following order creates those windows more reliably than trying to weave too many instant casts at once.
- Transmogrify (sheep)
- Pre-cast Fireball (time it to land as sheep ends)
- Cinder Burst (instant)
- Flame Bolt (follow-up)
- Withering Flames if target is low
Pro tip: don’t overlap CCs—wasted control is lost pressure. Use Mass Exhaustion in teamfights and Neural Prod to silence healers. Thunder Blast is your peel and setup tool at once.
“Make your CC count: one solid chain beats three half-committed ones.”
Warfront tactics
Maps change how you play. In tight maps, you must be aggressive with spacing; in open maps, prioritize sightlines. Port Scion? Hold high ground and farm angles. Library of the Runemasters? Expect melee in your face; plan escape routes and use Flicker creatively (through an opening, not just straight back).
- The Codex: control center platform, use pillars for LOS.
- Whitefall Steppes: guard flag spawns, sync bursts with teammates.
Rhetorical: Why chase a kill when holding a point wins the match? Keep that in mind.
Matchups: Warriors and Rogues
Warriors: kite. Use Thunder Blast to interrupt charges and slow them. Save Transmogrify for after immunity fades. Rogues: expect stealth and huge openers—survive the first burst then punish. Burning Bonds is clutch vs stuns.
One counterintuitive insight: sometimes lowering your Spell Crit and gaining more Valor makes you win more matches. It’s boring, but true—survive the opener, then out-damage them over time.
Macros, binds and a bit of code
Keybinds should make reactions instinctive. Put instant-casts on reachable keys. Use modifiers for situational spells. We found focus macros massively improve target control in chaotic fights.
# Focus Transmogrify
cast @focus Transmogrify

# Mouseover Neural Prod
cast @mouseover Neural Prod

# Burst combo (sequence)
cast Cinder Burst
cast Flame Bolt
cast Inferno
Recommended layout (simple): 1–5 for primary damage, Q/E/R/F for CC. Keep defensive cooldowns on a visible secondary bar. By the way, UI clarity beats flashy layouts.
Final notes (plain)
I’ve played tests, watched logs, and lost a lot to learn this. You’ll still die to a single perfect Warrior opener sometimes—this doesn’t always work—but you’ll win more than you lose if you follow timing and positioning. To be fair, team comp and skill differences matter.
Analogy: your kit is a scalpel and a hammer—use the scalpel for pickoffs and the hammer when the team commits. One stumble here—oh, that sentence slipped—remember to breathe and reset during long fights.
See you on the battlefield. Keep practicing, ask teammates for simple calls, and don’t be afraid to change a single point if your group needs it. — Mira (she/her) ⚔️