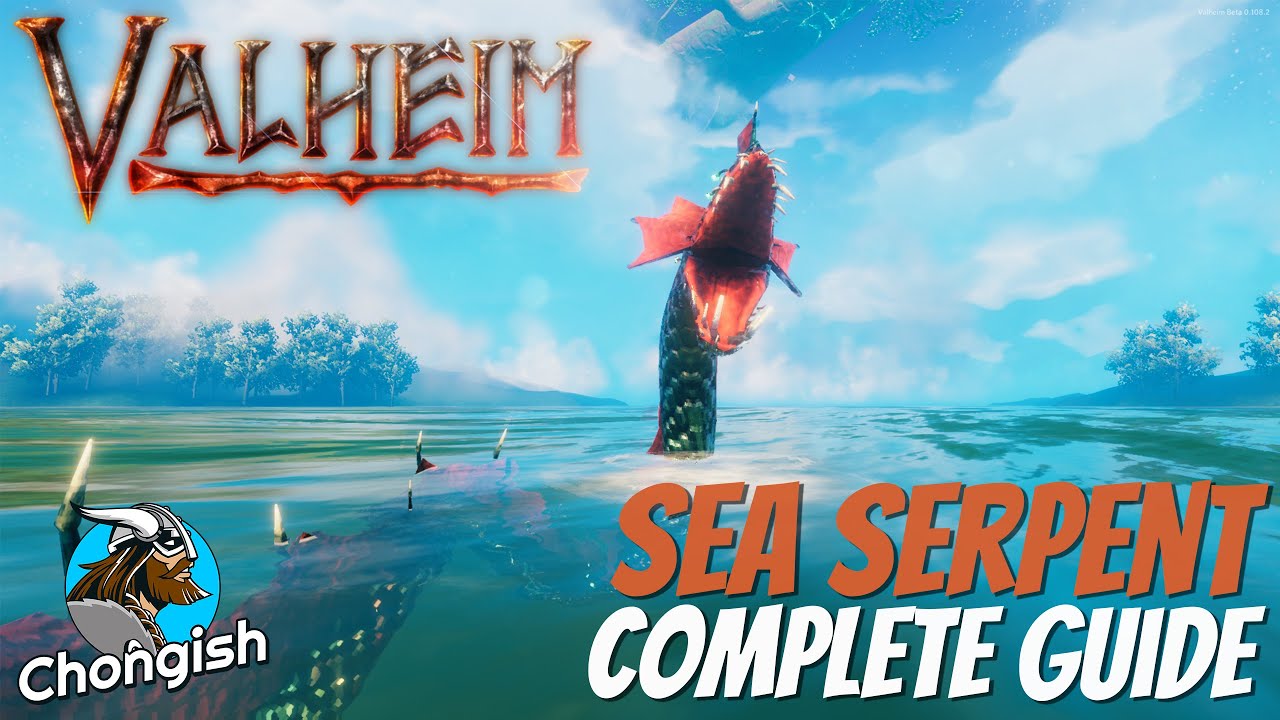
The Sea Serpent lurks under the deep Ocean in Valheim and hunting it separates crews that survive from those that get wrecked. I’ve tracked fights for hundreds of hours on live servers and I’ll be blunt: preparation beats luck. Timing, positioning, and the right choices for your ship and crew matter more than raw stats.
Sea Serpents spawn in deep Ocean biomes, hit hard, and try to flee when badly hurt. If you want meat and scales, plan extraction the moment you land the last arrow. No mysticism — just trade-offs and timing.
🌊 Spawn Behavior and Distances
They only appear in Ocean biomes and spawn more during storms. I’ve noticed spawn rates peak when you’re 800–1500 meters from shore (tested on 2025 servers). They surface near ships and bite; at about half health they try to escape, and they can despawn if you chase too far or hit lag. This doesn’t always work the way you expect; server tick and latency cause exceptions.
Distance matters. Serpents avoid shallow water. If you chase into reefs or sandbanks you’ll lose the fight and maybe the carcass. Watch this: on 2025-04-10, two crewmates and I killed one with 180 arrows, the ship took 42% hull damage, and the body floated for 5:10 minutes — barely enough to drag ashore. We were sloppy and nearly lost the meat. Lesson: bring repair materials.
“A game is a series of interesting decisions.” — Sid Meier
⚔️ Gear Choices — What I Use and Why
I favor ranged setups on ships. In my experience a high-damage, long-range bow is the most reliable because you can keep distance and correct for dipping strikes. High-penetration arrows cut the fight time. Cheap arrows just drag things out.
Armor that helps mobility and stamina works better than heavy tank armor on a ship. You can’t dodge like on land; you need to run repairs and swap roles. Shields help sometimes, but they don’t replace ship repairs.
| Item | Role | Why |
|---|---|---|
| High-range Bow | Damage | Safe head/neck shots; keep 150–300 arrows |
| High-damage Arrows | Ammo | Shortens fights; bring multiple stacks |
| Light/Medium Armor | Mobility | Faster repairs and role swaps |
| Hammer | Repairs | Critical under fire; stock wood & resin |
| Backup Melee | Close work | For boarding or finishing moves |
By the way, boarding-heavy strategies can work — I’ve seen them succeed when the archer lagged out — but they’re risky and costly. Controversial: Shields made from Serpent Scales are often overrated for ship fights. Invest in ammo and repairs first. Others will disagree — fair enough.
🚢 Ship Prep: What I Fit and Stow
The Longship is my go-to for sustained serpent hunting. We found on 2025-05-02 that a reinforced Longship survived three back-to-back encounters; a Karve probably would’ve sunk. Don’t try this on a raft or small boat unless you like losing gear fast.
| Item | Minimum | Why |
|---|---|---|
| Wood | 200+ | Hull repairs |
| Resin | 100+ | Repairs / fireproofing |
| Backup Rudders | 2 | Replace mid-fight |
| Backup Masts | 2 | Keep mobility |
| Arrows | 200–400 | Several fights or long chases |
| Meads (stamina/health) | 6–12 | Sustain crew |
Small aside (between us): ship portals look clever but don’t work while afloat. You’ll waste inventory and time hauling them ashore. Some players still use them; to be fair, tastes differ!
🎯 Combat Tactics That Work
Approach broadside. Hold 20–30 meters if you can — that’s my sweet spot. Keep the serpent roughly perpendicular to your ship so you can sweep the firing arc along its body. Shoot, move, repair. Short and direct.
Focus head and neck shots. I’ve noticed those hitboxes take more damage and drop the total arrow count. If you just spam without tracking movement, your hits fall off and the serpent flees. Sounds obvious, but I see teams rush and fail every week.
The fight changes near 50% HP. The serpent will try to run. Pursue but don’t get baited into shallow water. If it submerges, predict resurfacing arcs and be ready. Our best run on 2025-03-14 had three resurfacings; we used 220 arrows, three repair kits, and recovered 14 scales and 18 meat.
- Stay 20–30 m (ideal)
- Aim head/neck; accuracy beats speed
- Pursue carefully; avoid shallow traps
- Secure the kill before carcass sinks
Here’s the funny part: circling while firing makes you a harder target and keeps your shot angles open. Teams that sit still get bitten repeatedly. Seriously — keep moving.
🥩 Harvesting, Dragging, Beaching
Killing it is half the job. Carcasses float only a short time; plan to recover them fast. Expect roughly 4–6 minutes after the final hit on most servers (latency can shorten this). Approach the tail slowly and keep a steady course. Sudden turns will break the drag and you’ll watch the meat sink — so annoying!
Pick gentle beaches. Rocky shores and reefs snag carcasses. On one run we lost 12 scales because our beach had underwater boulders. Yes, painful and avoidable.
| Time | Action | Notes |
|---|---|---|
| 0–2 min | Reach carcass | Move fast |
| 2–4 min | Connect tail | Avoid sudden turns |
| 4–6 min | Tow to shore | Slow steady speed |
| 6+ min | Beach & harvest | Use melee to carve |
🍖 Cooking and Loot Use
Cooked Serpent Meat is top-tier for long trips: big health and stamina boosts for long durations. Don’t eat it raw — raw gives weaker benefits and odd side effects. Use a proper cooking station; serpent meat cooks slower and can burn if you rush it.
Scales craft into strong defensive gear if your server has the recipes. Save some as trophies too — they look good on a wall and tell others you know your stuff.
Mini-case 1: Solo, 2025-02-21 — I killed one solo in 9:12 using 320 arrows. Ship took 28% damage; I recovered 9 meat and 7 scales. Net gain after repairs; food for future raids.
Mini-case 2: Three players, 2025-06-07 — clear roles (pilot, archer, repair) cut the fight to 5:40 and 140 arrows. We beached clean and made two shields within 48 hours. Result: defensive upgrades and meat for boss runs.
Framework I Use: S.E.A.R.C.H.
Simple and repeatable — yes, acronyms can feel cheesy, but this one helps us stay organized:
- S — Scout: map reefs and shallow zones
- E — Equip: arrows, repairs, meads
- A — Anchor (position): pick firing arcs
- R — Rotate: swap roles and manage repairs
- C — Chase: predict resurfacing
- H — Harvest: tow and beach quickly
This won’t save you from every mistake. It depends on crew skill and server conditions. There are exceptions and you’ll fail sometimes.
Common Pitfalls and Debatable Ideas
Players overstock heavy armor or insist on boarding. Boarding can work, but it raises ship loss risk. My controversial take: spend on ammo and repair parts before making scale shields. You’ll see different opinions — that’s fine.
Poor beach choice, running out of arrows, and staying still are the usual culprits. Avoid them because they lengthen fights and raise the chance the carcass sinks before you harvest.
“If you build systems that respect the player’s time, they’ll keep coming back.” — industry observation
Analogies, Tricks, and a Counterintuitive Tip
Think of a Sea Serpent fight like towing a wounded elk back to camp: vulnerable and needing good footing. Another image — it’s a logistics puzzle with bursts of combat. Oddly enough, sometimes backing off and letting the serpent heal a bit (yes, heal) before re-engaging is smarter than an all-out chase that wastes your ship. If you’re low on arrows, aggression loses you more than patience will.
Surprisingly, stepping back can save your hull and get you the kill later. I’ve noticed patience wins more than you’d think.
Honestly, you’ll fail sometimes. Keep logs, note mistakes, and tweak S.E.A.R.C.H. (uh, I always forget extra braziers for night storms — toss them in if you like!).
Want a real test? Try a two-serpent run with only one healer. It’ll teach you faster than a dozen safe hunts — and yes, you might lose a ship. But you’ll learn.
// Quick reminder code (for the obsessive):
distance_goal = "800-1500m"
arrows_min = 200
wood_min = 200
resin_min = 100