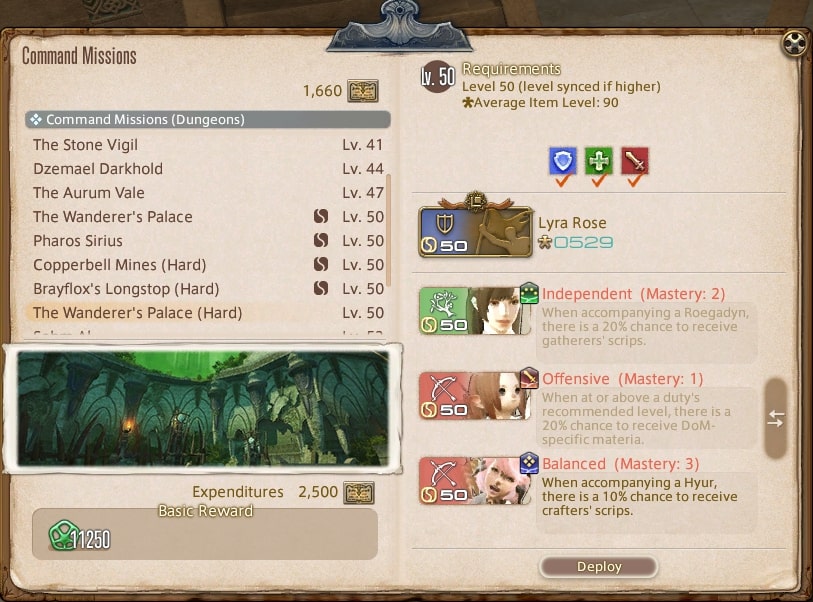
I run Command Missions regularly and I’ll tell you how to use them so they work for you. I’m a woman who’s coached new players and speed-runners in Final Fantasy XIV; in my experience, the squadron system turns dungeons into reliable solo practice and steady XP. You can learn fights, test rotations, and avoid queue waits — but it won’t always replace real players, depends on your goals.
🎯 Quick start (what you need)
Requirements are simple: hit level 47 on any combat job, reach Second Lieutenant in your Grand Company, and finish the “Squadron and Commander” quest to unlock the Barracks. After that you recruit NPCs, train them, and send them on Command Missions. We found that finishing those steps usually takes a few hours of focused play.
Want to skip downtime? Use Command Missions when you don’t want to wait in queues. Honest remark: some players overestimate how much AI can handle. It’s great for practice, but it won’t perfectly mirror a human raid party. There are exceptions.
🔔 Key points to set up
- Match squadron level to the dungeon target.
- Balance roles: tank, healer, DPS (AI fills these based on recruits).
- Pick recruits with the right primary stat for their role.
Why this matters: attributes control damage, healing, and AI decisions. Tactical stat raises frequency and quality of AI actions. I’ve noticed Tactical makes the biggest visible difference in tricky fights.
| Squadron Rank | Example Dungeons | Level Range |
|---|---|---|
| Rank 1 | Sastasha, Tam-Tara | 15–20 |
| Rank 2 | Copperbell, Halatali | 17–25 |
| Rank 3+ | Broader rotation | 24–60 |
📋 Recruiting and training
Recruitment gives random candidates with stat spreads. Prioritize the right primary stat for the job. Train to fix weaknesses—target Tactical for better AI choices. (This matters more than raw HP.)
Training example (short):
Week 1: Balanced +10 all
Week 2: Role focus: Tanks +Physical, Healers +Mental
Week 3: Tactical push +20
Tip: having specialized squads helps. I keep one for speed clears and one for survival. To be fair, that takes time and seals, but it pays off in clear rate and less babysitting.
⚔️ Combat with AI teammates
AI obeys simple triggers. Lead them. Mark targets, position smartly, and use commands: Engage, Disengage, Regroup, Execute Limit Break. These are your four big tools. Timing matters — especially Limit Break usage.
Advice: mark the priority target first. If the AI focuses the wrong mob, regroup and try again.
Short sentence. Move first. Then tell them to act.
- Position before pull
- Mark highest priority
- Engage, monitor healer MP
- Regroup if things go sideways
🏆 Dungeon and boss tactics
Early dungeons teach AI behavior; later ones punish careless positioning. For example, in Cutter’s Cry keep the team away from sand traps (that’s literally where AI gets stuck). In my experience the AI handles sustained heals and steady DPS well, but complex target swaps and movement-heavy phases trip them up.
Controversial? Some folks claim squadrons trivialize the game. I disagree — they change the challenge, they don’t erase it. Others say Command Missions are the best way to farm endgame; I think that’s wrong for gear progression (you’ll be slower than duty roulettes for certain drops).
Want a fast checklist?
- Pre-position
- Use attack markers
- Save Limit Breaks for hard phases
💰 Rewards and XP strategy (2025)
Command Missions give good XP and squadron growth. As of 2025, chaining runs with rested XP and food buffs is still the most efficient approach. Overleveling your squad can reduce XP efficiency — counterintuitive but true. Aim to be 2–3 levels above a dungeon’s minimum for best returns.
| Tier | Typical EXP | Best Use |
|---|---|---|
| Low | ~15k–25k | Early leveling |
| Mid | ~35k–55k | Balanced farming |
| High | ~65k–95k | Squad growth |
Practical routine:
1) Check rested XP; 2) Eat XP food; 3) Run 3–4 missions; 4) Train squad; 5) Switch jobs if you lose rested bonus.
🔧 Advanced customization
Personality and chemistry matter. Some combos boost damage consistency. I’ve experimented with tank-healer synergies and found Tactical-heavy tanks help AI positioning. Create loadouts for speed, survival, or exploration (yes, you can specialize for treasure runs!).
Template: Speed Team
Tank: High Physical + Tactical
Healer: Balanced Mental + Tactical
DPS: Max primary stat
Oddly enough, a cautious healer AI often outperforms an aggressive one on tougher fights because they preserve MP better. That’s a counterintuitive insight I only learned after many wipes.
“Train slowly, clear faster” — my motto.
Between us, some of this is trial and error. I’ve made mistakes (you will too). But consistent tweaks lead to big gains over time.
Final note: Command Missions are a powerful solo option. They won’t replace teamwork required for top-end raids, but they let you learn, level, and enjoy dungeon content on your terms. Want help building a squad for a specific dungeon? Ask me — I’ll walk you through it!
