I’ve played Final Fantasy XIV long enough to be blunt: dyeing gear is where character style actually happens. I write this as someone who’s rebuilt dozens of glamours, paid for too many Pure Whites, and learned the shortcuts the hard way. If you want clear, practical advice that saves gil and looks good, read on.
🎨 Basic requirements to dye gear
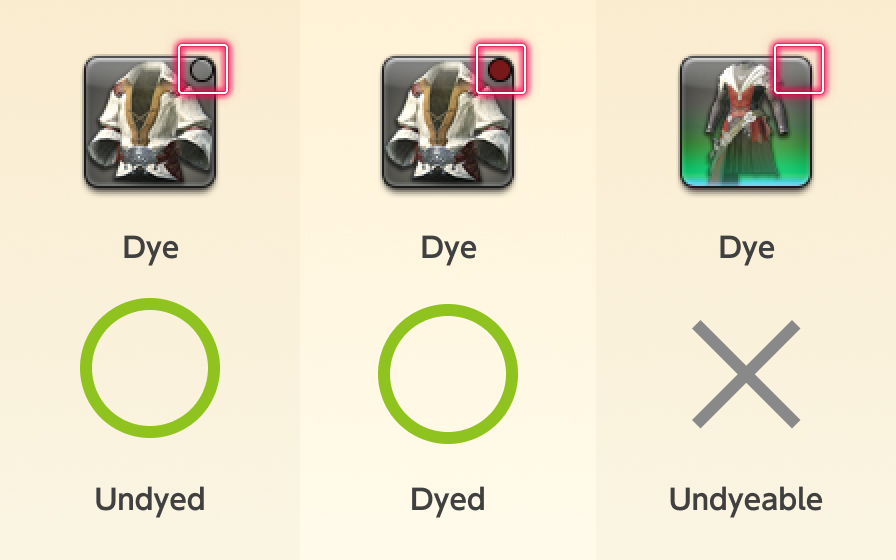
You must complete the level 15 quest “Color Your World” to unlock dyeing. In my experience, that’s the first real step toward looking the way you want in Eorzea. Only items that show the small circle icon in your inventory can be dyed. If the circle is white, it hasn’t been dyed; it will show the dye color after application.
Items must be bound to your character to dye them (equip or otherwise bind them first). There are exceptions—some event or raid pieces are locked from dyeing—so check the item tooltip before you spend gil. This doesn’t always work the same on every server or with every limited item.
💰 Where dyes come from and costs (short version)
Dyes come from vendors, crafted by Disciples of the Hand, the Market Board, or certain event shops. Prices vary wildly by server and demand. I’ve noticed basic dyes often sit in the low hundreds of gil, while sought-after metallics or rares can jump into the thousands.
| Dye Type | Where | Currency | Typical Cost |
|---|---|---|---|
| Basic | City vendors | Gil | ~216–432 gil |
| Rare | Special vendors / Tomestones | Tomestones of Poetics | ~100–500 tomestones |
| Crafted / Market | Market Board / Craft | Gil / Mats | 1,000–50,000+ gil |
| Event | Event shops | Event currency | Varies |
Watch the Market Board prices on your server on June 1, 2025 (and often thereafter); patterns change with patches and player demand. Some colors like Pure White or Jet Black can cost way more than they should—controversial, I know, but true!
⚙️ How to dye — step by step
It’s simple. Open your character window (press C), right-click the dyeable item, choose “Dye,” then pick a dye and confirm. The dye is consumed on application.
Use the preview option before confirming. Why? Different materials react to dye differently: leather reads matte, metal often looks reflective and muted, cloth shows true color. Previewing saves gil and frustration.
- Open Character window (C)
- Right-click item
- Select “Dye”
- Pick dye, preview, then confirm
Remember: dye is effectively permanent until you apply another dye. There’s no simple “undo” (unless you use Terebinth or apply a different dye). So test expensive colors on cheap gear first (yes, even on glam-only spares).
🌈 Color choices and coordination
There are many dye families: reds, blues, greens, purples, metallics, and specials. Cloth usually shows color truest; metal and leather differ. I recommend limiting main palette choices to two main colors plus one small accent. Why? Because the eye reads harmony easier than chaos. Want the outfit to pop? Use metallic accents sparingly.
| Family | Good For | Cost Range (typical) |
|---|---|---|
| Reds | Cloth, accessories | 300–2,000 gil |
| Blues | All materials | 250–1,500 gil |
| Greens | Leather, natural looks | 400–3,000 gil |
| Metallics | Armor, weapons | 10,000–50,000+ gil |
Quick tip: check dyes in different lighting areas—Doma, The Firmament, or Limsa can make the same color read very differently.
🔧 Glamour Plates and Pris—making dyed looks reusable
Store dyed pieces in a Glamour Dresser and save them as Glamour Plates. As of June 1, 2025, you can keep multiple plates (the dresser remembers dyes too). Glamour Prisms let you apply plates to equipment without re-dyeing pieces, and they’re craftable by Disciples of the Hand or bought from vendors (~500 gil each). Save up plates for themes—job-specific or seasonal—and rotate quickly.
“Save pieces you love in the dresser. It’s the single best way to stop burning gil on repeat dyes.”
Strategy: build at least one “base” plate per job (simple, low-cost colors) and one experimental plate with pricier dyes. That balance keeps you flexible and sane.
❌ Common mistakes I see (and how to fix them)
Impulsive dyeing is expensive. Ask yourself: will I keep this piece for glamour or is it temporary? If temporary, don’t dye it. Test expensive shades on cheap gear first. Also, color-clash disasters? They happen — because players pile on colors hoping for wow effect. It rarely works. Limit your palette and check how materials change the look.
- Don’t dye temporary gear.
- Always preview before confirming.
- Test expensive dyes on cheaper items first.
- Check in multiple lighting conditions.
Another pet peeve: some people assume rare dyes always look “better.” Not true. A well-coordinated basic dye often outruns an overpriced metallic. Counterintuitive? Yes — but I’ve seen it countless times. Also, markets can be manipulated; beware sellers listing Pure White at insane prices. That’s an annoying reality (and a bit unfair).
Advanced tips & oddities
Here’s the funny part: two identical dyes can look different on otherwise matching pieces. Why? Texture and base color. Also, some items have multiple dye zones—play with those to get two-tone effects without extra cost.
Want a quick workflow? I keep a small spreadsheet (yes, I’m that person) listing which dyes I used on each plate, plus the Market Board ID for rare colors. It saves time when I rebuild or re-buy a color. Below is a tiny example code snippet I used for personal tracking:
// Simple CSV header for tracking
Date,PlateName,Item,DyeName,Source,Cost
2025-06-01,BlueKnight,Helm of DoW,Sky Blue,Market,1200
Final practical notes (short)
Glamour should be fun. In my experience, planning and previewing matter more than spending on the rarest dye. There are exceptions, of course (event pieces sometimes justify splurging). Share ideas with other players, try odd combinations, and don’t be afraid to fail. Honestly, the best looks come from iteration and patience. Go dye something gorgeous!
— Written by a long-time glam enthusiast (she/her).